Lab 4 - GCC Build Lab
In this lab, we're learning how to build large software projects using tools like Make and Automake/Autotools. I'll be working on two servers, x86-001 and aarch64-002.
Task:
On both servers, I'll download, build, and install the latest development version of the GCC compiler.
Below are the steps to complete the lab!
1. Clone the GCC repository using the below command
git clone git://gcc.gnu.org/git/gcc.git
create a separate build directory to avoid building GCC in the source directory
mkdir ~/gcc-build-001
cd gcc-build-001
3. To set up GCC to be installed in a specific location (e.g., gcc-test-001), Run the configure script with the preferred prefix for the installation path
~/gcc/gcc/configure --prefix=$HOME/gcc-test-001
4. Build the source code using the below command
time make -j 24 |& tee build.log
The -j option in make specifies the maximum number of jobs that can run simultaneously.
The |& operator is shorthand for 2>&1 |, which redirects both standard output and standard error and pipes them into the tee command. The tee command then saves this output to a specified file.
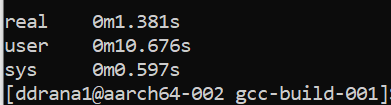
Record the build time for the x86 server:
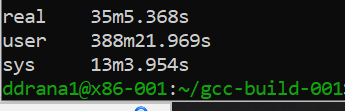
Explanation of Time Outputs:
- real: The actual elapsed time from start to finish
- user: The total CPU time spent executing in user mode
- sys: The CPU time spent executing in system mode
5. Install the build
command:
make install
x86 server
6. Test the build
commands:
export PATH=$HOME/gcc-test-001/bin:$PATH
gcc --version
make check
7. Verify the installation by checking the GCC version.
command:
gcc --version
x86 server

arch server
- Check the built GCC version:~/gcc-test-001/bin/gcc --version
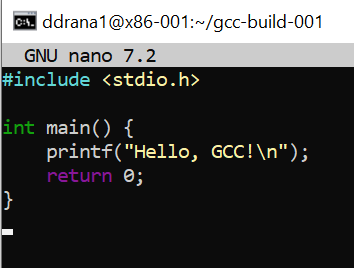
8. Build a C programTo verify that the newly built GCC can compile a simple C program:
Create a test C program:
nano test.cAdd the following simple C code:
Compile the program using the built GCC:
~/gcc-test-001/bin/gcc test.c -o test
Run the compiled program:
./test
If it printsHello, GCC!, then your compiler works correctly.
9. Update the timestamp on the file "passes.cc"
Method 1: Using touch command
commands:
cd ~/gcc/gcc
touch passes.cc
Method 2: Editing and saving the file manually
commands:
nano passes.cc
10. Rebuild the software after updating passes.cc11. Perform a "Null Rebuild"Run
makeagain without modifying any files:time make -j 24 |& tee null_rebuild.log
Reflections:
This lab was a great hands-on experience in building software from source, especially something as complex as GCC. The initial build took a long time, but it was satisfying to see it complete successfully. Testing the new compiler and comparing it with the system's GCC helped me understand the importance of version control in development environments. The incremental and null rebuilds showed howmakeoptimizes compilation by only recompiling necessary files. I also learned to use logging andtimeto track performance, which is useful for debugging and benchmarking. Overall, it was a challenging but rewarding process that deepened my understanding of software compilation.


Comments
Post a Comment